Carve a Cuff Workshop
Ever notice how many superheroes and heroines sport cuff-style bracelets? No doubt about it, the cuff is a powerful piece of jewelry--especially when you carve it yourself from solid wood. Learn a
wide range of skills from this challenging project: lay out
your design for maximum strength, practice rapid roughing and careful
carving, fine-tune for a comfortable fit, and add your favorite natural or decorative finish. No previous experience or superpowers required!

Cuffs are one of my favorite pieces to make and to wear but because getting a perfect fit can be tricky, I rarely sell them. I decided to offer this class after seeing would-be customers sadly put back a cuff that was too big or too small; each student in this class will end up with a cuff that's just right.
Since our time is limited, I will be bringing pre-cut cuff blanks--but I will also demonstrate cutting one during class so you'll be able to do it yourself.
I will also bring an assortment of carving tools that students can share. If you think that you will want to continue carving, I urge you to consider purchasing and bringing 1-3 of the carving tools below so that I can show you how to use and sharpen them.
Class Tools and Supplies
Your $25 materials fee will include:
-a pre-cut cuff blank
-use of shared carving and sharpening tools
-consumables such as wax, oil, sandpaper, scalpels, and paint
You should bring:
-a sketchbook and pencil
-a comfortable x-acto style knife handle and a few disposable blades
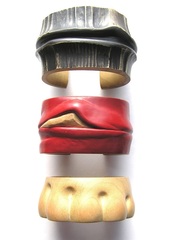
-there will be some paint available, but if you want a specific color you should bring it with you; my favorite paint for cuffs (like the red and brown ones pictured) is Testor's Model Master Acryl, available from hobby shops
-any additional embellishments you might like to use such as stones, wire, or tubing
-you are welcome to share the tools that I bring, but if you are serious about continuing to carve you may want to bring a few of your own chisels...
Shopping for Chisels

Choosing the right tools is a very personal decision, based on considerations such as your hand size, scale, studio situation, and budget. Adjust my recommendations to fit your own situation. And if you already have tools similar to these, great! Bring them along!
SHAPES
As a basic starting point, I recommend getting three chisels:
-a C- or U-shape (aka “sweep” or “gouge”)
-a V-shape (“parting tool” or “veiner”)
-a flat blade with either a squared-off or angled (“skew”) cutting edge
SHAPES
As a basic starting point, I recommend getting three chisels:
-a C- or U-shape (aka “sweep” or “gouge”)
-a V-shape (“parting tool” or “veiner”)
-a flat blade with either a squared-off or angled (“skew”) cutting edge
|
SIZES / STYLES
Almost any shape of tool will be available in many different sizes and handle styles. When choosing, keep in mind the size of the work you want to make, the size of your hands, and how much room you have for storing tools (handles can take up a lot of space!). BRANDS Of the many great options available, I think that the Flexcut brand offers the best balance of affordability and quality. Flexcut chisels are available either with fixed handles, or as interchangeable blades that snap into different handles; the snap-on blades take up less space so I can easily carry around one handle and 12 different blades in a small tool roll. Flexcut offers a variety of beginner kits; these are generally fine, but I were choosing my tools individually I'd get a handle and these blades (you can see them on the Tool Profile Chart pdf): SK317 45 deg. x 5/32" (4mm) Parting Tool SK407 #2 x 9/16" (15mm) Skew Double Bevel SK402 #8 x 3/8" (10mm) Sweep Another brand that I like is Dockyard; they sell sets of tiny microchisels that I use for carving details and for working with wax. SHARPENING There will be sharpening tools for you to use in class but if you plan to carve on your own some sort of sharpening system is essential. It's easy to keep Flexcuts and other small chisels sharp with the Flexcut SlipStrop. STORES I keep my eyes open for sales and have bought from many local and online sources, but Woodcraft.com is very reliable and offers a "birthday club" discount. |
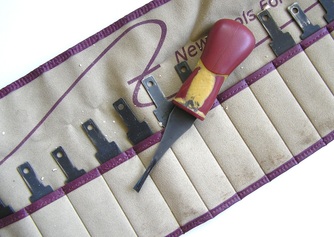
My tool roll with one handle and many blades; note that I store them point down.
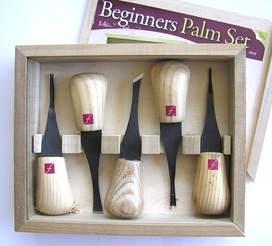
A boxed beginners set with fixed handles.
|
MY RULES OF CHISEL OWNERSHIP
1. Don't buy more than you need; start with 2-3 and grow your collection as appropriate.
2. Don't waste your money on cheap tools.
3. Treat your tolls with care: keep the ends capped or covered, never let a cutting edge touch another piece of metal!
OTHER TOOLS
Other hand tools I may introduce in class include: razor saw, adze, draw knife, drill, crooked knife, or mallet. Don’t run out and buy these, but feel free to bring any that you already have and I can explain how and when to use them.
|
© 2015 - 2023 Julia Harrison, LLC |

