Carve Your Niche, Arrowmont June 24 - July 7 2018
In theory, carving is simple: just remove what doesn't belong. But in practice...? This workshop aims to strip away intimidation, complication, and confusion, making carving a versatile staple of your personal creative practice. Through conceptual and technical exercises and guided worktime, you'll develop safe skills and efficient approaches for every stage--from layout to roughing to final detail. We’ll work at a small scale that’s perfect for jewelry but also applicable to furniture, sculpture, or instrument-making. You’ll get familiar with a wide range of hand- and power tools and a spectrum of soft, hard, and unconventional materials including wood, wax, bone, stone, and epoxy. Through discussions and slides we’ll also explore how and why carving has been pursued at different times and in different cultures. You'll leave with a wide range of samples, at least one finished work, and--most importantly--a carving approach customized to your own aesthetic, budget, and goals. Why just find your niche--when you can carve one?
Welcome!

Thank you for enrolling in Carve Your Niche!
I am really looking forward to this class and to meeting you all. Two weeks will fly by, so in order for us to hit the ground running, please read the information on this page carefully.
You've received a supply list from Arrowmont, but this page will go into more detail about choosing tools and supplies. You'll also find some preparation suggestions, as well as slideshows of inspiring images. I will continue to add to this page as we get closer to the class, so keep checking back, and don't feel like you have to tackle everything at once.
As you read through this page, keep in mind that this class is about you and your work. This page contains very few requirements and a lot of suggestions that you will have to filter through your own personal situation. I understand that this may be more difficult than a straightforward shopping list, but you are the expert on your own goals, limitations, and priorities.
Here are some things about me that may help you to see where my advice is coming from:
-For many years, I was constantly moving and had to carry all of my tools and materials with me. I still do most of my carving in a small apartment bedroom.
-I am generally short on money and/or time.
-I prefer to work quietly and slowly.
-I have asthma and allergies.
-I consider carving to be a way of thinking as much as a physical action.
-I love figuring out how to carve (sometimes unconventional) materials that I find in daily life.
Location
We’ll be based in the Metals studio, but will visit other studios for a few demos. As a jeweler, I’m very comfortable in Metals, but if you are not interested in making jewelry, don’t worry! Working small will give us a chance to experiment more efficiently, and almost everything you learn can be scaled up.
Equipment
I will expose you to a wide range of equipment--hand tools, power tools, tools for cutting and abrading, large and small tools. Our class supply fee will include some materials and the in-class use of some shared carving and sharpening tools, but you will need tools of your own. The tools that I have asked you to purchase or bring are mostly hand-powered, small, lower-cost, and extremely versatile. I have tried to keep budgets in mind, differentiating between essential tools and optional tools. Again, when you shop for tools, keep in mind your personal preferences and goals; for example, if your work is tiny or full of details, buy smaller tools, or if you work big, buy bigger tools. When in doubt: buy late, don’t open the package, save the receipt. I can help you decide whether to keep or return. You will also have time during Week One to order additional tools or supplies.
Materials
While a lot of our carving practice will be done in wood, we will also experience a wide variety of materials--natural, manmade, hard, soft, fibrous, smooth, tough, fragile, water-soluble, flammable, etc. These will be grouped by their working properties and associated tools. Thinking again of budgets, I have not included some of the weirder materials in our class fee; you’ll have the option of purchasing or ordering these materials after the demo. I will go into more detail below about these materials, and about what you might want to bring if you are certain that a particular material/technique is of interest to you.
Activities
Classes will include slideshows, examples, discussion, demonstrations, drawing exercises, experiments, assignments, and worktime.
Structure
Week One will be jam-packed with information and demos; we won’t worry much about aesthetics or personal style. In Week Two, we’ll slow down and focus on cementing what you’ve learned through guided work on personal projects; I will continue to offer demonstrations of specialized tools and/or advanced techniques, but these will be entirely optional.
Conclusion
My goal is to show you both how to carve and why working subtractively can be a satisfying approach to many situations. I hope that you will end the class equipped to carve in whatever material or scale appeals to you.
ESSENTIALS
-carving tools (see below)
-a sketchbook or notebook; I like wire-bound ones that will stay open
-mechanical pencil
-favorite sketching/drawing media
-safety glasses that fit over whatever vision glasses you wear
-N95 dustmask; I like the washable fabric ones or the disposable one with an exhale vale so your glasses don't fog up
-x-acto
-patience: carving is my favorite activity but even I admit can be slow and frustrating. Please bring whatever will encourage you to step back and take a break as needed: your running shoes, a supply of yerba mate, a stack of old People magazines...
ESSENTIAL Carving Tools
You will need your own carving tools. Borrowing someone else’s carving tools is like borrowing their underwear: maybe ok in an emergency, but not really comfortable for either of you.
Choosing the right tools is a very personal decision, based on considerations such as your hand size, scale, studio situation, and budget. Adjust my recommendations to fit your own situation. And if you already have tools similar to these, great! Bring them along!
Choosing the right tools is a very personal decision, based on considerations such as your hand size, scale, studio situation, and budget. Adjust my recommendations to fit your own situation. And if you already have tools similar to these, great! Bring them along!
|
SIZES / STYLES
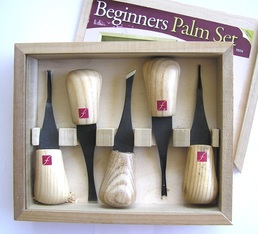
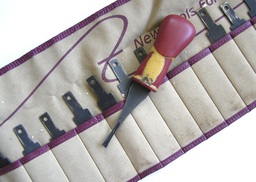
Almost any shape of tool will be available in many different sizes and handle styles. When choosing, keep in mind the size of the work you want to make, the size of your hands, and how much room you have for storing tools (handles can take up a lot of space!). Larger wooden handles also give you the option of hitting them with a mallet. FLEXCUT Of the many great options available, I think that the Flexcut brand (pictured) offers the best balance of affordability and quality. Flexcut chisels are available either with fixed handles, or as interchangeable blades that snap into different handles. The snap-on blades take up less space so I can easily carry around one handle and 12 different blades in a small tool roll. The larger handles (not pictured) can be used with a mallet. Flexcut offers a variety of beginner kits; these are generally fine, but I were choosing my tools individually I'd get a handle and these blades (you can see them on the Tool Profile Chart pdf): -SK317 45 deg. x5/32" (4mm) Parting Tool -SK407 #2 x9/16" (15mm) Skew Double Bevel -SK402 #8 x3/8" (10mm) Sweep |
A boxed beginners set with fixed handles.
My tool roll with one handle and many blades; note that I store them point down.
|
OTHER BRANDS
Palm chisels:
Micro chisels: Dockyard Ramleson
SHARPENING
There will be sharpening tools for you to use in class but if you plan to carve on your own some sort of sharpening system is essential. If you buy Flexcuts, also get a Flexcut SlipStrop; this is a simple tool for keeping small chisels in good shape. For larger tools or tools that
STORES
I try to buy locally if I can, but some online sources are: Woodcraft.com, Japanwoodworker.com, Rockler.com, Kestreltool.com. Woodcraft offers a "birthday club" discount and frequent sales.
MY RULES OF CHISEL OWNERSHIP
1. Don't buy more than you need; start with 3-6 and grow your collection as appropriate.
2. Don't waste your money on cheap tools.
3. Treat your tolls with care: from the second you open the package, keep the ends capped or covered and never let a cutting edge touch another piece of metal!
OPTIONAL Tools and Materials
These are things that might be useful but are not essential. You can bring them if you happen to have them laying around--particularly if you have the luxury of coming by car. I am happy to help you figure out how to clean up and use old tools but don’t bother bringing anything that is poor quality (eg dollar store chisels) or in terrible condition (totally rusted, chipped).
Glove
Some people feel more comfortable carving with glove on their holding hand. Accident-prone? Consider bringing a heavy leather or "cut-proof" kevlar glove for your non-dominant hand.
Woodworking tools
Chisels are far from the only way to remove material! Here are some of the other tools I may demonstrate during class. Don’t run out and buy these, but feel free to bring any that you already have and I can explain how and when to use them.
-razor saw, keyhole saw, dovetail saw, coping saw
-adze, small hatchet
-draw knife, spokeshave, crooked/bent knife, marking knife
-mallet
-cabinet scraper, spoon scraper, detail scrapers
Jewelry or metalworking tools
Waxworking:
Additional materials
T
Personal materials
Are there materials that you'd like to learn how to carve? Bring them along! There are some
Carving examples
Here are a few of the hundreds of images of carving and woodwork I've collected over the years. In preparation for the class, please start making your own collection; I've noted artist names wherever possible so you can use these as a starting point if something catches your eye. I'd suggest both keeping copies of the original image and using your sketchbook to make notes about what it is about an image that particularly engages you.
|
© 2015 - 2023 Julia Harrison, LLC |


