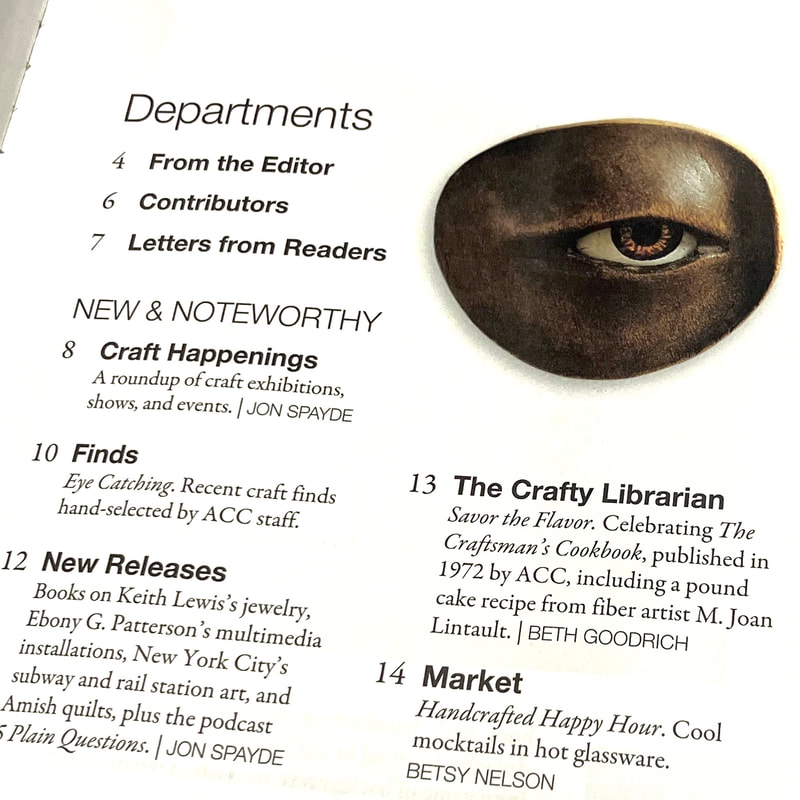
 As I’ve shared before, one of the most valuable bits of professional advice EVER came me from the marvelous Janice Hosegood, then manager of the much-missed Electrum Gallery. Reviewing my portfolio, Janice’s only criticism was that my prices were too low. Since that was the opposite of what I’d heard from every gallerist ever I was a little startled. Janice patiently explained that my work would never appeal to everyone, that I needed to price it so that I could afford for it to await the right person, and—unlike a pear in a fruit bowl—good work wouldn’t go bad from simply biding its time. So Janice: this little press clipping is for you! Kamakura is a pair of wooden brooches based on statues from Japan’s Kamakura period; they’re stained dark, like wood exposed to smoke over centuries, and have eyes made from watch crystals, reverse-painted and gilded and inset into the wood from behind. I carved these pieces in 2005. Over the next decade, they alternated appearing in 5 different gallery shows with hibernating in a shoebox under my bed. Sometime after I moved to Penland in 2020, I put them up on the wall of my gallery space. I dithered about displaying older work, but I liked looking at them; they still felt like my work, and I was still satisfied with them, even if no one else appeared to be. Then during the weekend of Penland’s 2022 auction, the brooches were purchased by Andrea Specht, executive director of the American Craft Council. This month (May 2024) she nominated them as her pick in American Craft magazine’s “Finds” section, writing, “From the moment I saw this pair of Kamakura brooches, I couldn’t think about much else until I returned the following day to buy them…I wear only one at a time, and every time I do, I feel like I have an unspecified superpower.” Made in 2005, sold in 2022, superpowered in 2024. We live in a time that emphasizes dopamine loops, just-add-water success, and lists of “Ten People Who’ve Changed the World Before Turning Ten,” but without taking anything away from those ingenues, I’d like to suggest that slow success can be satisfying too.
1 Comment
 After three years, it’s my last week as a Resident Artist at the Penland School of Craft.
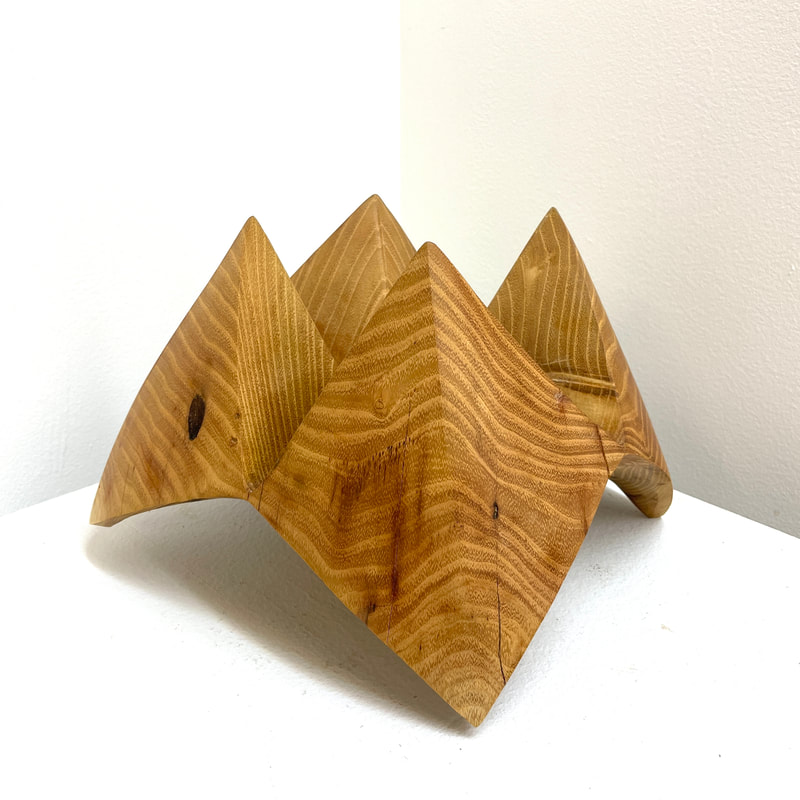
For much of my life, I’ve had to be strong-armed through change—flailing, bawling, and dragging baggage like a newborn with colic and hoarding issues. While this drama has kept my parents and friends well stocked with blackmail stories, it has taken a toll on me, at worst trapping me in paralysis and at best bookending positive experiences with corrosive misery. How, then, does the imminent end of my appointed time at a magical place find me relatively calm and cheerful? I think it’s down to the fact that I’ve spent so much of the last three years carving, which is to say: I’ve been practicing how to transition from one plane to another. When I start a carving, particularly if I’m working with a piece of material that’s already a square-ish block, I often draw the front view on one face and the side view on another. Then I saw around the first outline, carefully keeping all the sawed-off bits, tape the bits back together, and saw around the other outline. The unwanted material falls away like the segments of a weird orange, leaving only a rough, Lego-like version of my design. This is the fastest route I know of to jump from a block of wood to a blocky but recognizable version of the shape I have in mind. The speed of this transformation is gratifying, but with their sharp corners, flat sides, and starkly differentiated FRONT and SIDE views, there’s something aggressive and unsettling about a piece at this stage, like the sculptural equivalent of a mugshot. But then comes the part of the process I love best! I get to coax those standoffish planes into conversation with each other. It’s so much more than simply rounding the corners; the way that one plane slides or stutters or leans into its neighbor is more like the dynamic between two dancers or the movement from one musical note to the next. The transition is everything, not something to rush through or endure. For most of my life, change has felt like one of those blocky roughed-out forms: like Front and Side, Before and After seemed completely separate, the line between them painfully abrupt. Carving has taught me that change doesn’t have to have such hard edges, that a beautiful transition carries Now into Next, making them an integral part of each other. My favorite way to look at a sculpture is to walk all the way around it, appreciating how its contours and features interact. It’s impossible to create those interactions without appreciating the power of transition, and it’s impossible to appreciate them without moving. Like one plane flowing into another, my experience of Penland won’t so much end as alter. I’ll never enjoy moving but now I can embrace transition as a chance to shape the relationship between what came before and what comes next. 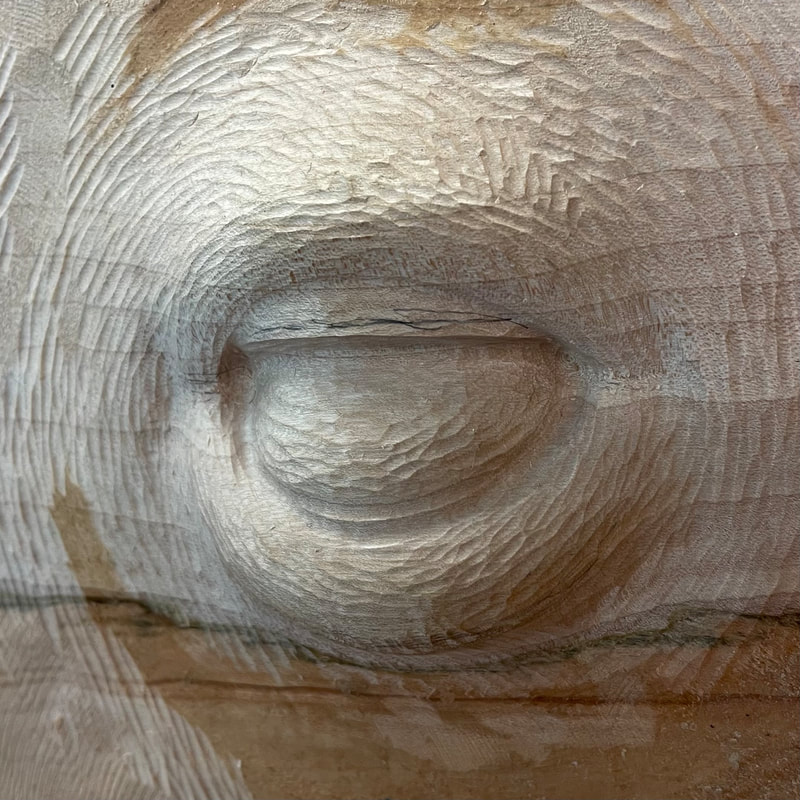 They say that public speaking ranks alongside death on the list of things people fear most, but unlike death, public speaking is something that gets easier with practice. These are a few thoughts that have helped me learn to love giving artist talks…
Love Them Actress Sarah Cannon played the Grand Ole Opry character Minnie Pearl, sporting a gingham dress, a straw hat with the price tags attached, and an ear-to-ear grin. She was an optimistic and outgoing bumpkin who could talk to anyone. Asked about the secret of her/Minnie’s stage presence, Cannon boiled it down to this: Love your audience, and they’ll love you right back. Ever since I learned this, I’ve taken a moment before any presentation to wrap my audience in an imaginary hug; it’s way more effective than imagining them naked. Make it Matter If you have the opportunity to get up in front of people who are willing to listen to you, for heaven’s sake don’t squander it: talk about something that matters! It’s almost always possible to give the talk you want to give in the guise of the talk you’re supposed to give. Say you’re supposed to talk about yourself and your career: do you really want to recite a list of accomplishments? Or would you be more comfortable and excited to share something you’ve learned the hard way? Something that might help your audience to face their own challenges? Repay their attention by giving them value. The Nerve! A long time ago when I gave my first talk at a national conference, I was so wretched with nerves I considered pulling a fire alarm. Instead, I stepped up to the lectern, took a deep breath and involuntarily gave the tiniest little wet-dog shake to vent my nerves. Afterwards several people mentioned that shake; it was something they identified with, an unrehearsed moment that got them on my side from the start. So while I don’t enjoy feeling nervous, I know it’s just part of the routine, and I don’t waste my energy trying to fight it or hide it. Me TV Even if you are miked up and standing in a spotlight, I guarantee that no one is paying as much attention to you as you are. People remember gists and impressions. You can flub a sentence or mispronounce your own name or have spinach in your teeth and barely anyone will notice, much less record it in their diary later that night. Bonus tip: this is also true at parties! Blurb Not Bio In the course of three years at a craft school, I’ve seen a looooot of artist talks and in general, the talks that leave the audience wanting more are the talks that leave something out. When the presenter shows every work they’ve ever made, there’s not much left to say. And when they show everything they’ve ever made and take double or triple their allotted time to do it, the audience will talk…but not kindly. 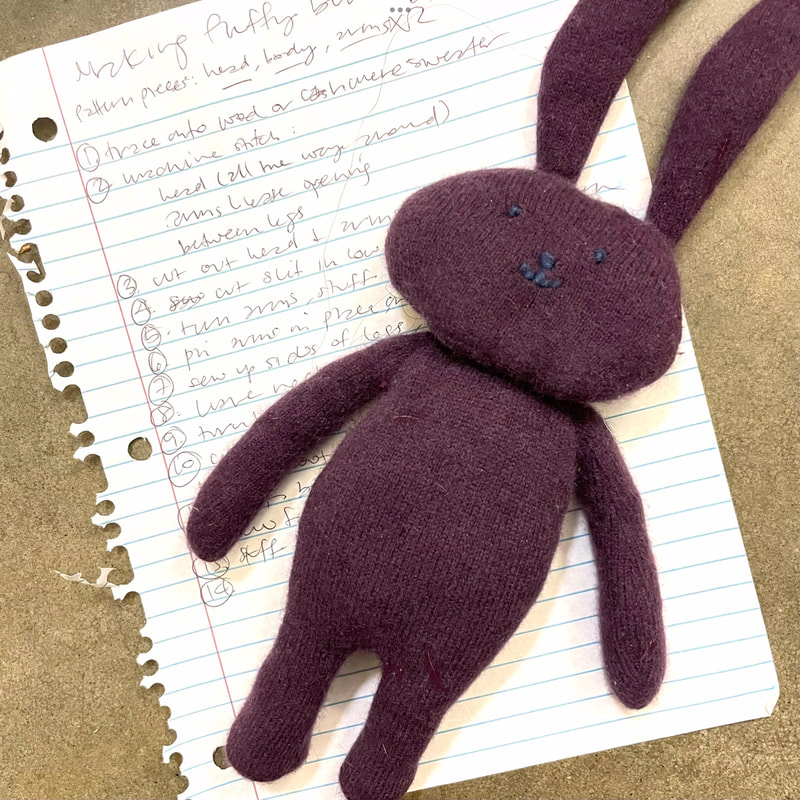 When I was maybe nine or ten years old, I learned to weave a specific type of friendship bracelet at summer camp: odd numbers of threads folded into loops, lassoed over one’s fingers, then walked over, under, and around each other like dancers at an Elizabethan party. I made absolutely yards of it while eating, watching TV, riding in cars, and possibly while sleeping. I memorized the process in both my spongy young brain and my springy young muscles. Yet some twenty years later when this cord would have been perfect for a project, I could remember everything except how to make it.
I utterly love figuring out new tools, techniques, and materials, but trying to resurrect something that I previously learned and subsequently forgot is infuriating. For another twenty years*, that dastardly friendship bracelet taunted me, resisting my periodic attempts to find instructions online, or reverse engineer the process with diagrams and bits of string. Thank heavens that I’ve since learned a thing or two about learning! Primarily that my memory is not to be trusted. In our costume cutting class at the University of Washington, Laurie Kurutz exhorted us to annotate each pattern piece as if we might get hit by a bus later that day: what labels, marks, and notes would enable another person to literally pick up the pieces and finish our project? In a jewelry workshop, Sarah Loertscher shared her process writing the “recipes” that were the basis of her successful production line; her practice of making a detailed record of each design including materials and amounts, manufacturing steps and setups, and even the time involved allowed Sarah or an assistant to remake any item at any time, and to price appropriately. Now If I think there’s even a remote chance I might want to revisit a project, I leave myself the most pedantic trail of crumbs. It might be a sketch, or a snapshot, or a quick video, but most often it’s a list of specific materials, measurements, and steps in a sprawling “how-to” Google Doc that has the benefit of being easily searchable. Besides keeping me from being in a constant state of rage, these reference materials support my natural inclination is to work in batches (a.k.a “binges”). I refer back to these almost daily; thanks to my “how-to” doc, I was just able to make a batch of concrete bricks for the first time in three years, candlesticks for the first time this year, and a fresh batch of the bunnies I sew every couple of years as baby gifts—all without having to reinvent any wheels! *There’s a happy ending to this story: last year my friend Kit Paulson got into making friendship bracelets and found instructions for weaving my white whale! 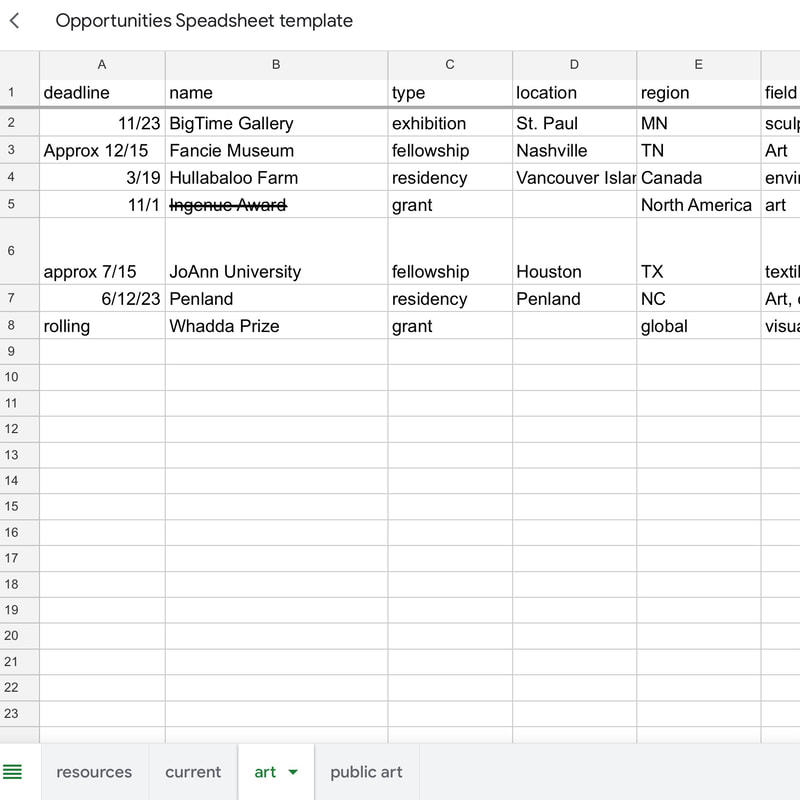 Until you reach a level of achievement and notoriety at which opportunities are flung at your feet, chasing after grants, residencies, fellowships, scholarships, and shows is part of the job of being an artist (writer, creative person, etc). The sooner you establish a system for spotting, capturing, and cataloging those opportunities, the better your chances of making them your own.
I’ve been using a spreadsheet and the strategies below for more than 20 years. My sheet now includes hundreds of items; I won’t apply for allof them, and I for darn sure won’t win most of them, but I can tell you in seconds which ones I should focus on next, what the application entails, and when I should send it out. It’s not a magic wand, but it is really helpful. Get to know your quarry Schedule time specifically for researching possible opportunities (in addition to the time you set aside for working on applications). There are so many print and online databases for this type of information! Use the “sources” tab of your spreadsheet to list useful websites, newsletters, magazines, or books. In the beginning, investing a few hours every week or month might make sense; as your list grows, you can dial down the time you spend on active research. If you are new to this work, I would suggest going to the research section of a local or university library and getting a librarian’s help zeroing in on sources that are relevant to your goals. Many of the most established opportunities are printed in massive books; these grants and residencies don’t tend to change much, so if you take careful notes you never really have to look at these books again (note the name of the book on the “sources” tab of your spreadsheet, and that you’ve gotten all you can out of it). Return to this list regularly and figure out a schedule for revisiting the most valuable sources. If a source dries up and stops giving you anything new, keep it on the list, but make a note that it is no longer useful. Ask instructors or others in your field where they find out about opportunities. While many sources are free, there are a few digests that charge for whittling an overwhelming list down into a few suggestions that fit your criteria; some offer a free trial period. Some subscriptions may also be available through your school or library. For sources that are updated more frequently, make a plan for when to check them. It will take you a little while to work out how often it is worthwhile to visit a particular source, but when you figure that out, make a note on your sources sheet. Keep your ears on Even when you aren’t actively doing research, you will come across possibilities. You’ll hear about a classmate getting a grant to travel, or you’ll see a call for entries on Instagram. Get this information down however you can—a note, a screenshot—but transfer it into your spreadsheet as quickly as possible. Cast a wide net Use separate tabs for each different area of your interest—even if you’re just dipping a toe in a particular area. Let’s say I’m a visual artist who wants to get more serious about her business and dreams of writing a novel someday (hmmm…); I definitely want to capture information about opportunities for art exhibitions and grants on one sheet, and opportunities for business-development courses and funding on another, but as long as I’m at it I might as well also start a sheet for any writing-related opportunities I happen to stumble across. If and when I finish a novel, I’ll have a ready list of competitions and publication grants to try for! The same goes for application criteria. For example, if you find an ongoing opportunity that requires you to be fully fluent in a language that you’ve only just started to study, record the details and note “fluency” in the “criteria” column. It might even help motivate you to continue studying. Keep your ducks in a row Create or modify headings as needed to keep track of relevant information—the name and type of the opportunity, the location, the selection criteria, etc. You may also want to note anything that would affect the time an application might take—say, if you need to provide 10 references, or transcripts, or a live performance video. Keep an eye on the clock You’ll definitely want to note down any deadlines, but when your lists get really long, you may want to shift your strategy for tracking them so you don’t miss out. You could sort a sheet by deadline rather than keeping things in alphabetical order, or you could regularly copy upcoming applications into a separate “current” tab. And remember that some recurring opportunities can have different deadlines each year; sometimes I note a deadline as “approximate” until I can confirm it. Prioritize If you have limited time for applications, track any information that will help you decide where to concentrate your efforts. Note if an opportunity is one-time or recurring; a one-time opportunity might have fewer applications, while a recurring one might give you the chance to revise and resubmit the same application more than once. If possible, look up how many applications are typically received and how many are accepted. If there are selection criteria, be very honest with yourself about how well you meet them. Hang onto the duds This might seem a bit mopey, but don’t delete any items from your lists of ongoing opportunities. If you delete something that caught your eye once, it’ll probably catch your eye again and then you’ll waste time re-researching and remembering why you weren’t eligible to apply for it in the first place. Instead, strike through the name of the opportunity and under “notes” explain why: perhaps the grant is on hiatus, or perhaps it only funds Canadians, or functional potters, or Canadian functional potters under the age of 27. There you have it! Happy hunting and please let me know if you come across any massive grants for sweets-obsessed Appalachian woodcarvers over the age of 50.  ***Hello! I am not an accounting or tax professional. The post below is based on my personal experience, is shared for informational purposes only, and does not constitute legal or financial advice. This is how I operate based on advice from my trusted sources; if you have better or more up-to-date advice, please let me know!***
One of my least favorite parts of tax preparation is checking my 1099s and getting them corrected as necessary. The most common error? Reimbursements being included in compensation totals; the best way to address that error is to stop it from happening in the first place. What is a reimbursement? When you’re paid back for a purchase of materials required to do a job. As an example for this post, let’s say I’m teaching a kids’ drawing workshop and the school expects me to buy crayons up front, on the understanding that I’ll be repaid after I submit a receipt and a check request. I’m not profiting from this transaction; the amount I spent and the amount I’ll be paid are exactly the same. The reimbursement amount is not income, and I should not have to pay income tax on it. Sounds simple enough; what’s the problem? First of all, I have a fundamental issue with the reimbursement system. I am essentially giving the school a zero-interest loan, which they may take months to repay. Reimbursement is limited to the purchase price of the materials; generally I am not compensated for the gas I used getting to the store, or the time I spent shopping, divvying up the supplies into packets, or filling out the reimbursement paperwork. So it’s already a raw deal, but the infuriating icing on the disadvantageous cake comes if I get a 1099-NEC the next year and see that the amount I was reimbursed for the crayons has been added to the amount I was compensated for teaching the class. This means that I will have to request (and possibly argue for) a corrected 1099 and wait to file my taxes until it comes…or suck it up and pay federal income tax on the cost of the crayons. Yikes! What do you do to avoid these hassles?
Again, this is just my personal strategy, and I’m always open to adjusting it. If you are a teaching artist, please take the time to formulate your own plan and have the courage to stick to it. If you are a studio or payroll administrator, please consider the impact that your supply prep and reimbursement policies have on your teaching artists, and on your efforts to attract and retain the best teachers. Naturally, there are as many resident artist living arrangements as there are artist residencies. I’ve spent from one week to several months living and creating in: a swank bungalow on an island, an otherwise vacant conference hotel, a couple of cabins in the woods, and a sweltering inner city dormitory with four bunk beds, vinyl mattresses, and sealed shut windows, that could have doubled as a pizza oven. Luckily, my longest residency has been matched with my best living situation. My apartment at the Penland School of Craft is tiny and spare and light-filled and I absolutely love it. It’s perfect for one person but couples and even families have managed to live in them. I arrived with minimal furniture and over the last 2.5 years I’ve curated a collection of furnishings that are low, reflective, or see-through, which keeps them from eating up too much floorspace or view. 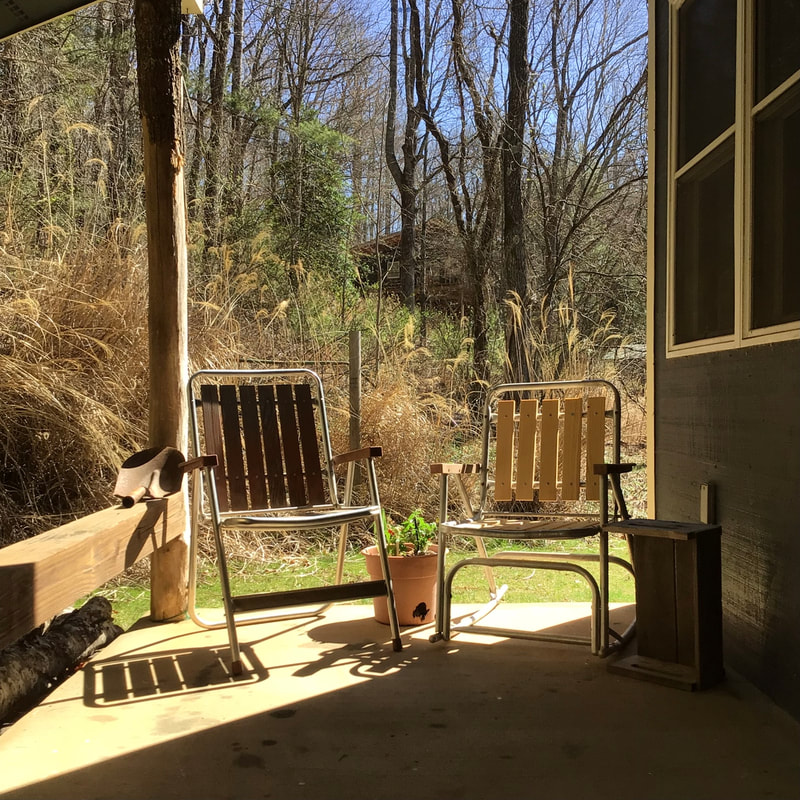 Half of the residents live by the studios, and half (including me) live about an eight-minute walk down a windy dirt road. Our little complex is made up of two duplexes, and I live in half of one. The approach to my unit takes you past all the other units on one side, and on the other there’s a steep hillside covered in invasive but pleasantly swishy miscanthus grass. In these woods right outside my door I have seen and/or heard deer, raccoons, skunks, opossums, and one bear (!). I once saw 24 coyotes in the field behind the house. Because we’re so deep in a hollow, my porch only gets early sun, but that makes it a great place to have breakfast or coffee in warmer months. All my vintage aluminum outdoor furniture folds for storage; the chair came from a thrift store and I pulled two rockers out of a dump and replaced their rotten wooden slats. In cold weather I hang a suet block for the birds, but soon I’ll switch it out for a hummingbird feeder and bring some of my larger plants outside. 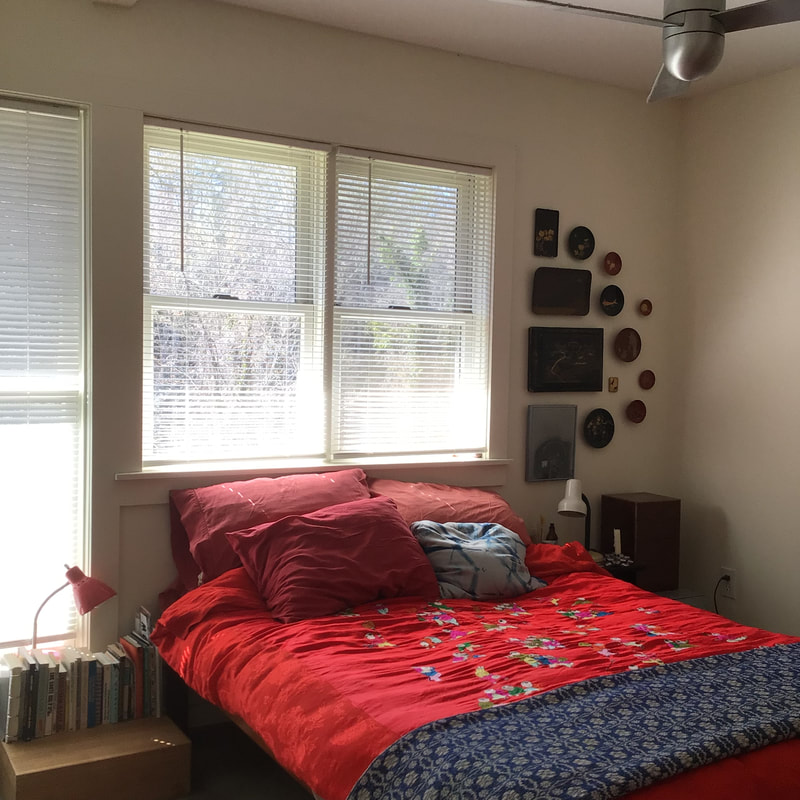 Just inside the front door there’s a tiny entryway bursting with coats, bags, shoes, and other things intended for the outside world. There’s also a door to the laundry/water heater room, which is part hellhole (where I stash everything I don’t want to deal with) and part paradise (where I can do laundry without waiting in silent fury for neighbors to get their clothes out of the machine!). The bathroom is the next door down the little hall and you’re not seeing it because it is fiendishly difficult to keep clean. It has the same challenges as the rest of the house (grit blown and tracked in from the dirt road outside, cobweb jungles that spring up overnight) plus a tenacious turquoise tinge from the copper in the water that makes everything look like it’s had a blue rinse, scrub as I might. I put a filter on the shower, which has helped some. During the great toilet paper scare of 2020, I bought a stainless steel shattaf (a Middle Eastern type of bidet that is easier to keep clean and perhaps healthier for women) and it is also handy for spraying down the shower during cleaning. There is a tub! The bedroom is at the back of the house. For reference, my bed is a full and there’s plenty of room to maneuver around it. There a couple of built-in cabinets, a long closet with sliding doors, and a small open closet (perfect kayak storage) made from closing off a superfluous doorway to the kitchen. I like to look out the window behind the bed first and last thing each day. At night I peep at the moon, stars, or lightning bugs, in the morning I greet my favorite tree; if I’m up early enough I can turn my head uphill towards main campus and watch the top of the mountain blush pink as the sun touches it. Oddly, this is the only room in the house that doesn’t have a heated floor, so I pile on blankets in winter. In summer, the ceiling fan runs non-stop and the windows are usually cracked. My collection of lacquer dishes and a self-portrait by my favorite college professor hang on the wall, and on the bed I keep a blue-and-white antique coverlet similar to those that were woven here at Penland when it was first started. That reminder of the history and creative continuity of this place helps me to keep my own experiences in perspective. 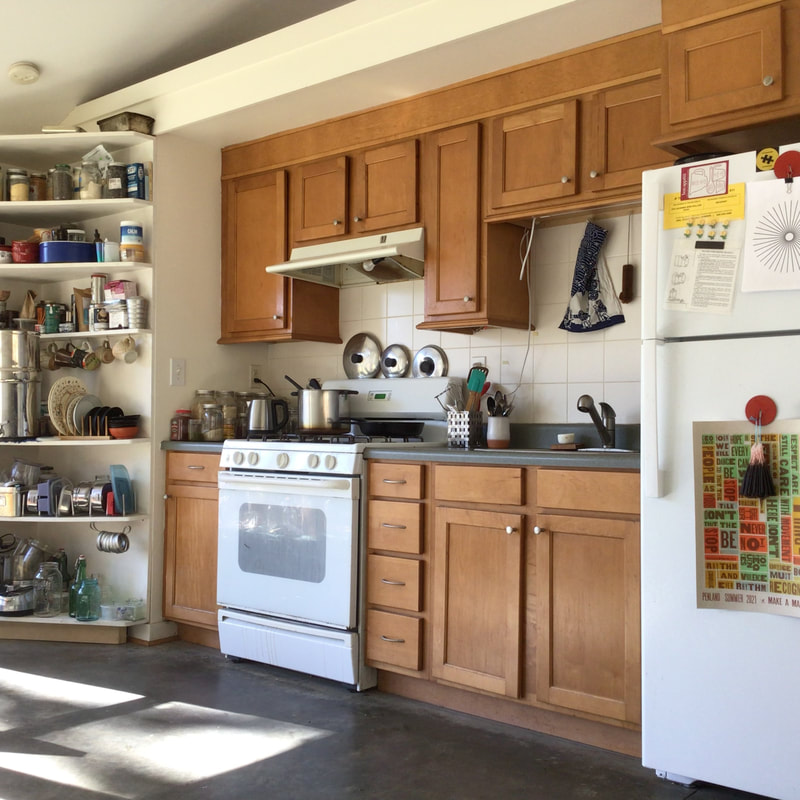 With the exception of the bathroom and the laundry, the house is just one big room with a high ceiling. The kitchen is essentially a room divider that stretches partway up to the ceiling, allowing for the free circulation of cooking smells and cool breezes. Storage is minimal and counter space is miniscule. Thank heavens for a previous resident who built the shelves on the left in what used to be a doorway to the bedroom: I don’t know what I would do without these!! Our hot water, appliances, and radiant floors run on propane—which yes, I realize is an environmental disaster so I will avoid it when I am able to make such decisions for myself—so when the power goes out we are still able to make tea. 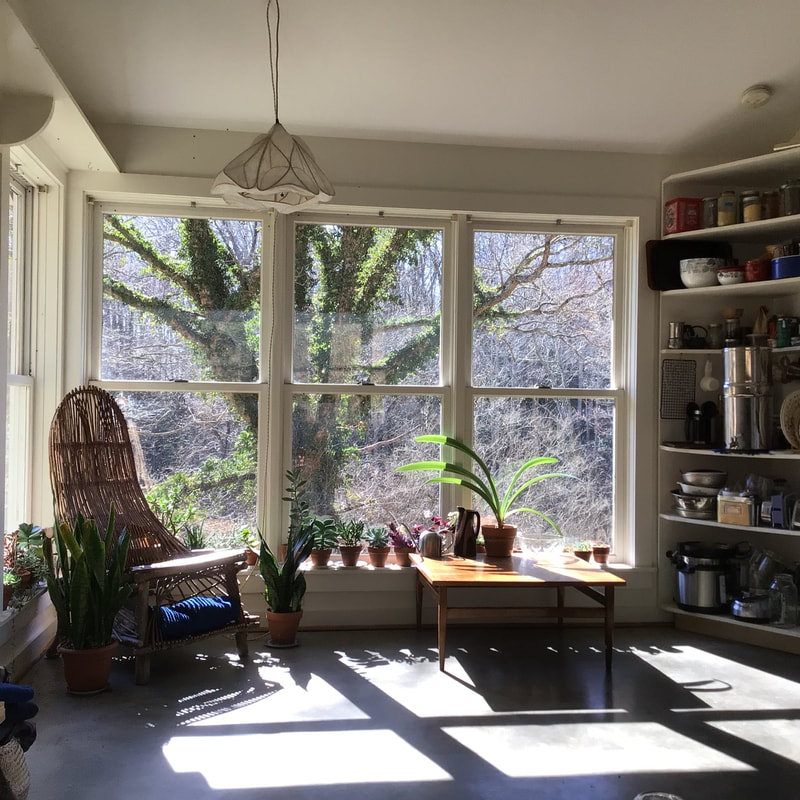 I have spent hours, perhaps days, looking out this window. That’s the tree that I think of as a neighbor, and yes, I do periodically go out and hack bits of ivy off of it. Most of my plants were tiny when I bought them for a dollar at the grocery store and a few are now getting too big for the sill. I made the willow chair at a workshop here sometime around 1999 with the magical furniture maker Clifton Monteith; I made the paper lamp in a workshop with Mario Messina. If your eyes are sharp, you may spot a number of black dots on the wall. These are false ladybugs that were introduced to the area to control pests but turned out to prefer lounging around in nice warm houses. My place is crawling with them, as well as with stinkbugs, glass spiders, and silverfish. Or “roommates”, as I’ve come to call them. 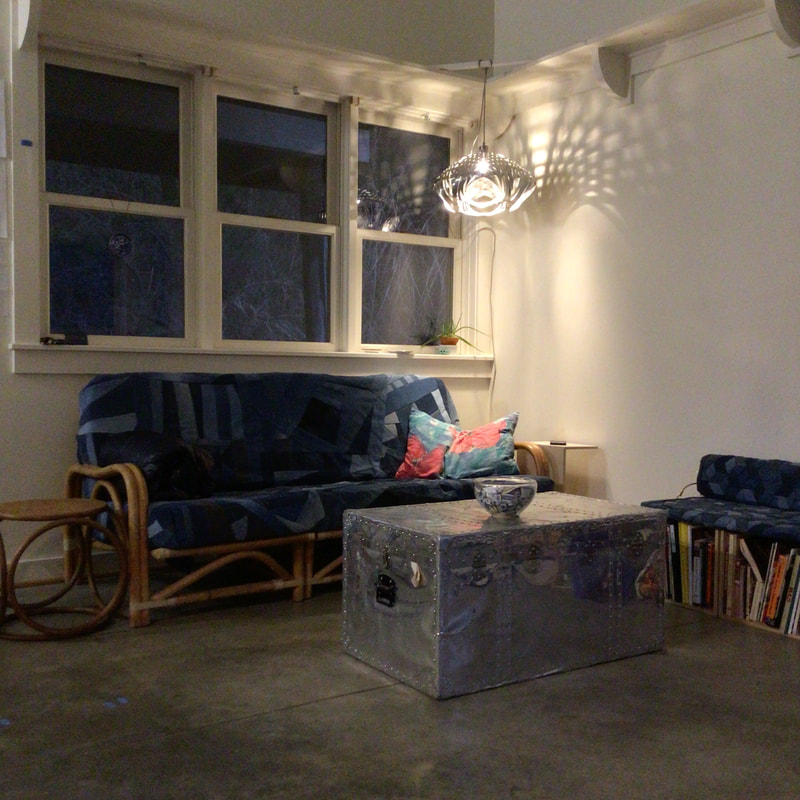 On the opposite site of the room from the big window are these three windows (which will be open all summer), looking out to the porch and the bird feeder shenanigans.
The vintage rattan sofa came all the way from Seattle and it’s one of my favorite pieces of furniture; it splits into three sections so I can easily move it all by myself. I pieced the slipcover together from old jeans. Four plywood crates provide storage for books and canned goods underneath, and additional seating options on top. One is cushioned with a woven denim mat. The light has a woven aluminum shade. The side tables are a vintage Thonet and a thing that I cobbled together from plywood that doubles as a writing lap desk. The coffee table is a vintage Japanese steamer trunk covered in aluminum that I bought when I was working at Hosekibako, a Japanese thrift shop that is one of Seattle’s hidden treasures; on the move here it held all my most fragile artwork. I’m not naturally very tidy or very hospitable, but I’ve been working on it. So far this year, I’ve had at least one person over for coffee or a meal each week. This virtual “tour” aligns with that habit, but my goals in sharing go even further. When I was considering this residency, a couple of previous residents showed me their living spaces and the effect was to make the possibility of the residency more concrete. I figure there’s a good chance that someone reading this post is debating whether or not to apply for the Penland residency; perhaps seeing my living arrangements can help to settle the debate, help to make this leap of faith seem more doable. And perhaps one of my readers will even be the next person to live in—and love—my apartment! 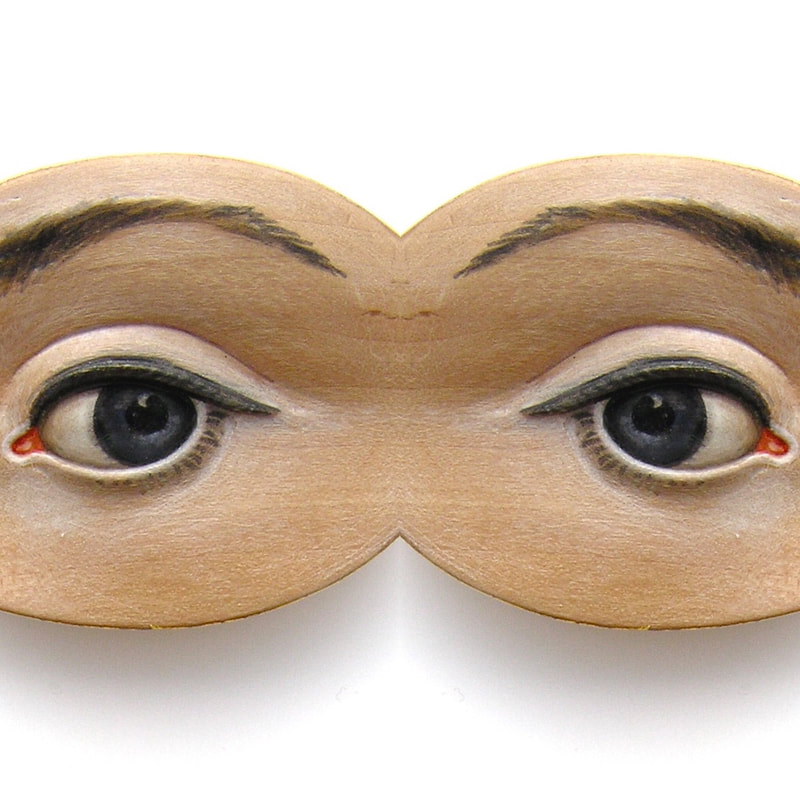 Reading a year-end article from a blogger I normally agree with, I came across some advice that didn’t sit well. She challenged us to deal with envy by first wishing those whom we envy well, and then moving on. I’m totally down with the first part (more on that below) but I believe that to try and sweep envy aside unexamined is not just difficult-verging-on-impossible, but also wasteful. Envy is an invaluable tool for self-reflection and redirection, particularly for those of us whose lives have proceeded along atypical lines.
Inevitably Enviable One thing I’ve learned from joining a community of driven and high-achieving artists is that a seat at this table comes with a heaping helping of comparison. Comparison has always been a compulsion for me, but back when I was surrounded by geologists or lawyers, it was easier to recognize the folly of measuring my failures as an apple against their achievements as oranges. Now I am an apple among apples, daily aware of how crisp and ripe the others are. These comparisons frequently trigger envy, which I experience as a kind of pull or tug exerted by someone else’s achievements or acquisitions. I have wasted so much time trying to ignore that pull, but eventually I learned that envy has stuff to say and the more I try to shush it, the more insistent it gets. Some sins are like power tools: deadly and useful! Each experience of envy shows me something about who I am and who I might be. Jealousy into Envy But while I entertain and even cultivate envy, I do everything I can to stay free of jealousy. Although the terms are often used interchangeably, jealousy and envy are fundamentally different. Envy is wanting something that someone else has; jealousy is wanting to have it instead of them having it. If I envy your ice cream sandwich, I’d like to have one too; if I’m jealous of your ice cream sandwich, I lie awake at night plotting ways to take it from you. Jealousy springs from a sense of scarcity and/or the habit of score keeping. Perversely, it reinforces itself by depleting your time, energy, and strength. Jealousy is corrosive, diminishing and destabilizing everything it touches. While I’m no stranger to jealousy and, as with envy, I’ve never had much luck at ignoring it, I have learned to convert jealousy into envy through a process of interrogation. I shine a bright light on its pinched little face and demand the facts: Does that person having The Thing really keep me from also having it (or something comparable)? And is The Thing exactly and truly what I want? More often than not, the person with the ice cream sandwich is happy to tell me where to find the ice cream truck. And then when I get there I realize what I actually want is a Choco Taco. Specificity > Scarcity For the most part, when you take a calm step back from feelings of envy, you can see there’s more where that came from: there are more fish in the sea, more cute shoes, more success, and even, more money. But what if you can’t shift into a sense of abundance because it really seems like there’s only one of what you want? Only one job, one first prize, one front cover? What if your friend Jesse is dating someone and it’s burning you up because you think Jesse’s Girl is the one-in-a-billion match without whom your life will be hollow? Ok, so until cloning is an option, there isn’t an abundance of Jesse’s Girls. So the key to learning from this envy is to get more specific. Perhaps what’s tugging on you isn’t Jesse’s Girl, but the relationship between Jesse and JG: the way they look at each other, or swap hats, or cheerfully team up to wash and dry dishes together. In that case, even if you could lure JG away (the jealousy move), it’s unlikely that you, a different person, would be able to generate the same chemistry. However, if you keep the Jesse+JG model in mind as you date other people, you’ll be better equipped to recognize what you’re looking for when you find it. But what if it really is Jesse’s Girl, the unique individual, who exerts such a pull over you? Maybe JG is the funniest person you’ve ever met, around whom you become the second funniest person. Perhaps instead of severing JG’s relationship with Jesse, what you really want is to establish an entirely new relationship, one in which you and JG start writing and performing comedy together and go on to become global superstars, with Jesse himself cheering you both on from the wings. Envy (and evil twin, Jealousy) can lure us into seeing the world as a binary of have and not-have. If we can learn to sit with our envy and get to know it in detail, envy can also suggest beautifully customized ways of having, doing, and being. Envy as Intuition As mentioned above, I believe envy is especially useful for artists and other people whose lives and/or career paths are non-traditional. Not only are our paths generally non-linear and lacking in easy-to-spot signposts or milestones, we tend to meander down them in a bit of a daze, preoccupied by our creative passions. In this lovely daze, it’s easy to forget about what lies beyond our immediate attention, to become diverted or wander in circles. Envy can act as a kind of GPS; it reminds us to look up and check in with our surroundings, it suggests where we should detour, slow down, or take a shortcut. I owe my current position as a Penland Resident Artist to just such a GPS. When I first visited the Residents Studios here in 1997 the tug of envy was so sharp it left me breathless. For the next 23 years I wandered through various jobs and studies, and each time I was reminded of the Residency, the pull of envy gave me an opportunity to course correct. As I got nearer to what I wanted, I experienced more and more envious moments, and therefore more opportunities to fine-tune my aims and approach. Maximum Resonance I remember very little of substance from the year I spent torturing a cello teacher (who eventually protested that she couldn’t, in good conscience, continue taking my money) except for the magic of sympathetic vibration. If you bow a note on a single string and its neighbor is tuned to the same note, the neighbor will hum along without any contact from the bow. A lot of marketing—both commercial and social—aims at getting something in us to vibrate in response to whatever cool/sentimental/aspirational product or life plan is being peddled. Having emotional strings that are stretched and ready to hum along is one of my assets as an artist, but it also makes me ridiculously susceptible to being played, with the result that I’ve cried at cellphone commercials, bought absurd shoes, and enrolled in unsuitable schools. Over the years I’ve learned to recognize when envy provokes only a shallow sympathy within me, like the humming of a single spindly string, and to reserve my attention for responses that are deeper and more genuine. Today, I only take envy seriously if I can feel it resonating in my head, my heart, and my gut. If envy is redirecting me in a way that feels smart, good, and true, it becomes something to aim for; if not, its appeal is shallow and I know from experience that it will quickly pass. Envy of All My Friends During the years I tried to avoid feeling the sting of envy, that often meant avoiding the smart, successful, fun-to-be-around people who might trigger envious feelings. This was self-sabotage cloaked as self-care! It turns out that the people who have what you want are exactly who you want to be around. Like the ice cream sandwich eater above, they are experts who can tell you how they got what you want, and maybe they can tell you how to get it too. Close proximity to people like Jesse and Jesse’s Girl allows you to try before you buy, figuring out what exactly what you want before you make your move. Today, I’m proud to say that everyone I’m close to has one or more attributes that I find enviable, attributes that I can celebrate and mine for inspiration. No-Envy Zone I also believe that each person should have some arena in which they are so rock-solid that the tug of envy finds no purchase. Mine is my art. That’s not to say that I think I’m the best artist, or that I don’t envy other artists’ circumstances, reputations, accolades, or paychecks. I can appreciate, celebrate, and learn from their artwork, but I don’t envy it. Even when my work isn’t going exactly as I would wish, it’s my work: it’s work that only I can do and it’s the only work I want to be doing. I can’t wait to see what I do next—and I hope that every artist feels the same! Like so many of my posts, this has been my attempt to articulate and publicly commit to a course of action. It was useful to me to get it all down and I’d be so happy to hear if anything was useful to you.  Over the years I have sold my work in dozens of different venues and I’ve experienced dozens of different financial arrangements. When I first started out, I tried to keep my profits consistent; in those days, different shops or galleries might have been selling the same work at different prices.
These days I strive to keep my prices consistent, so that a buyer will pay the same price at own studio in North Carolina as they would at a gallery in Seattle. In the age of the internet, buyers can shop around, but I don’t want them to have to. But keeping my prices consistent means that I have to be careful to set prices that accommodate a range of different situations. Here’s how I reverse engineer my prices for three common retailer relationships… I am the retailer I sell work directly to customers through my website or during studio visits. I retain all of the money the customer paid for the work, BUT it’s important to realize that this isn’t pure profit: I’m also having to pay for card service fees, sales tax, shipping, packaging, rent, display, customer service, etc. If I retail a piece for $100, I keep $100 minus the additional costs of completing the sale. I am wholesaling work to another retailer This is the relationship I experience least often, and it usually applies to lower-priced production work. I sell the work to a shop or gallery, who will then sell the work a second time to the retail customer. I can set my wholesale price (what the gallery pays me for the work), but I can only suggest the retail price (for the kind of work I do, retailers commonly double the wholesale price to set the retail price). The retail shop or gallery owns the work so they can price the item higher that I suggest, or they can put it on sale. In either case, I earn my wholesale price and the retailer bears any additional costs of completing the sale. If I wholesale a piece that has a suggested retail price of $100, I typically make $50. I am consigning work to another retailer This is the arrangement I enter into most often. I send the work to the gallery or store but I continue to own it until a customer buys it; if it doesn’t sell within a certain window of time, it will be returned to me. If you’re aiming for consistent retail prices, you need to know how much the gallery or store is going to increase your wholesale price in order to set their retail price.. This “retail markup” is often expressed as a ratio or a multiplier. Common ratios are “50/50” (as in the gallery doubles your wholesale price and you each get half of the retail price) or “60/40” (in some cases this means the artist gets 60% of the retail price, while the gallery gets 40%, but it can also be the other way around so be sure to ask which number is the gallery and which is the artist if it’s not specified). Other galleries will multiply your wholesale by 2, 2.25, or even 2.5 to reach a retail price. If you deal with a gallery that offers the artist more favorable terms (aka a bigger cut), woo-hoo! You’ll pocket more of the proceeds! If you’re considering selling through a gallery that has a higher-than-typical markup, be sure that whatever services or support they offer justifies their getting a bigger cut (do they print catalogs? Or have a clientele you’re eager to meet?). This is where things start to get a little messy. If I consign a piece that retails for $100, the amount I will earn from the sale depends on the gallery’s markup. If the gallery is 60/40 (artist/gallery) I will earn $60. If the gallery is 60/40 (gallery/artist) or has a 2.5x markup, I will earn $40. Your prices should always cover your expenses AND allow you to turn a profit (I’ll say more about this in a separate post). If you are selling in different venues and your want your prices to stay consistent, you will need to set a price that still allows you to cover expenses and turn a profit GIVEN THE LEAST ADVANTAGEOUS FINANCIAL ARRANGEMENT. Set your retail prices according to the markup of the gallery or store that gives you the smallest slice of the sale. In the examples above, I’m selling the same $100 item, but my cut varies from $40 to $100; if set my retail prices with the $100 profit in mind, I will be losing money every time I sell through a gallery that only pays me $40. This is just my way of doing things and a different approach may be better for you. Whatever you chose, aim for clarity and consistency, and always ask if terms or conditions aren’t spelled out, rather than making assumptions or hoping for the best!  When I was awarded my first public art commission, I felt like a hunter-gatherer trying to compete on The Price is Right—only instead of guessing the price of a washer-dryer, I was assigned a fixed budget and tasked with generating an appropriate artwork. It was abstract to the point of absurdity; I just couldn’t figure out what $40,000 was supposed to look like.
Even as public art and public art opportunities become more widespread, the financial side of things generally remains opaque. Although I’ve never bought a washer-dryer, I’ve seen enough ads to know roughly how much they cost; on the other hand, I’ve eagerly examined hundreds of public artworks…without ever knowing the costs involved. I could probably guess the weight of many public sculptures more accurately than I could guess their project budget! I’d be even less confident guessing how much of that budget ended up in the artist’s pocket. Leaving aside conversations about commodification, elitism, and cultural values, I’d like to emphasize how detrimental this secrecy can be to anyone hoping to get started in public art: in the absence of concrete information and examples, many of us underestimate costs, overdeliver on designs, and dig ourselves into budgetary holes. So for the sake of transparency, I’m going to choke down my culturally-conditioned discomfort with talking about money and share the budget and expenses for my recent project (Connected Community at the Miller Community Center in Seattle), with further comment on specific expenditures below. Total budget $46,000 Insurance $500 Fabrication supplies $1,400 Paint $600 Tools $1,000 Local mileage $250 Crate $800 Shipping $4,500 Travel for installation $3,000 Installation service N/A Seattle city taxes $3,500 Supplies / Tools / Paint / Mileage: One advantage of the technique I used for this piece was that the raw materials are relatively cheap. When I first planned the piece I hoped to use more reclaimed materials but the lull in shipping during the pandemic meant I had to change my plan and purchase new material instead. The pandemic also meant that the new material was harder to find, more expensive, and more expensive to ship than when I originally designed the project. I had to purchase a lot of new tools specifically for this project, but most of them are things I will be able to use again. I split paint out from the rest of the supplies so you can see that it’s a significant expense—even for a very small amount of paint. This was my first time purchasing paint and the cost surprised me! Local mileage comes from running errands to pick up tools and supplies—and this was when gas was much less expensive than it is at the moment. Crate / Shipping: Both of these expenses were much higher than originally anticipated. Because I moved cross-country during the project, transporting the piece back to Seattle was a challenge. I priced out all of the options and decided to hire a shipper rather than driving the piece myself. Because of the shipping backlogs and driver shortage I had a lot of trouble connecting with a specialty shipper; we ended up hiring an installation service (see below) and using a shipper that they arranged. The rising cost of plywood and construction foam meant the crate itself was another unexpectedly high expense. Travel for installation / Installation service: Given the difficulty I was having with long-distance logistics, my project supervisor and I decided to hire a professional art installation service. The cost of this service came out of a contingency fund, which we were able to access because the project had been impacted by circumstances I could not have foreseen from the outset. I don’t know exactly how much the installation ended up costing, but it was roughly a third of the total project budget. For any future projects, I would factor this cost in from the beginning, whether I ended up using the service or not. The installation service received the crate and arranged for all the equipment we would need on-site, but I still needed to travel to Seattle to participate in the installation. Again, in the future I might change my design so that my presence would not necessarily be required for installation. . Seattle City taxes: After I moved away from Seattle, the city pre-deducted sales tax from the payments it made to me. I’m not sure how common this practice is, but I’m mentioning it here as it had a significant and unexpected impact on my bottom line. What’s missing from the expenses list? In my previous post on public art, I suggested making a pre-project inventory of your existing assets—that is, things and people who can help you save time or money on the project. Assets crucial to the success of this project included: free studio rent and utilities, access to a wide range of expert advice, access to a sandblaster, access to a wood shop to prep parts for the crate, access to a forklift to get the crate out of my studio. If I had had to pay out-of-pocket for any of these, the project expenses would look very different. The biggest invisible line-item of all was my time and labor. I did almost everything myself and I did it painstakingly: research and design, technical samples, fabrication, accounting, paperwork… I logged my time closely enough to be able to more accurately predict how long a future project would take. After much fumbling and figuring out, I would certainly be able to do things like fabrication more quickly next time, but I also spent a lot of time on tasks that were out of my control and probably always would be: correspondence, meetings, chasing service estimates, travel. Going forward I plan to triple or quadruple my estimate of how long it will take to do any task that involves the participation of other people. So was this project profitable? Yes and no. If you just look at expenditures, I’m in the black. If you factor in the replacement cost of all the in-kind assets I brought to the table, the profit margin drops. Divide that by the hours I put in, and I still wouldn’t have gotten into debt, but I would not have been making a living wage. But while this might not have been a lucrative project, I can’t consider it a total loss. I’m not out any money; I did lose some time, but I learned something from (almost) every minute of it. It also gave me the opportunity to see my work at a scale I’d never attempted before. My second public art project has left me much better equipped to handle a third. If I manage to land one, I hit the ground running with a more realistic notion of how to design a project that is a more suitable fit for the given budget. |